Microsoft Lync Server 2010 with CUCM 8
Kasım 1, 2011
http://tech.rundtomrundt.com/2010/11/microsoft-lync-server-2010-with-cucm-8.html
Many of my customers already have an existing PBX in their environment, and do not necessarily want to swap entirely to MS Lync Server as the only telephony platform(or the previous OCS2007 R2).One way to implement Lync server with the enterprise voice feature for end users, is to make it co-exist with the already existing PBX.
There are quit a few documents out there, describing such integrations. But I couldn’t find any for my particular case. So here is my way of doing an integration between Lync and CUCM8.First of all; Some of the customers are fairly small, and can not justify the investment in a full scale enterprise topology. They only want to keep to the minimum – Standard edition server. What’s great about the Lync SE is the support of a co-located mediation server. And as long as the clients can have a direct ip connectivity to the gateway, and the gateway supports the media bypass (Cisco will refer to this as “media flow-around) you can get away with only one server (for internal purposes).
To answer the important question; does CUCM 8 support media bypass? Yes it does. At least in my lab.
This guide is not a step by step guide, but a collection of settings on what I did to make it work. Refer to the documentation on exact steps to accomplish your task if you are inexperienced in any of the subjects.
Here is the way I configured both the Lync server and the CUCM to make this happen:
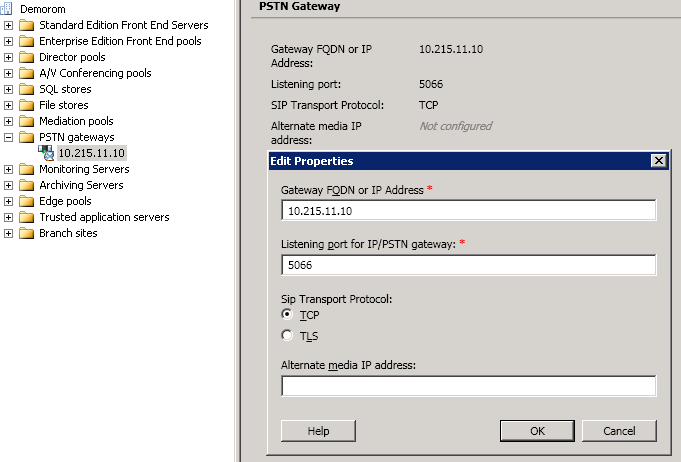
1: In topology builder, add the CUCM8 ip-address as the gateway in your system (ps: make a note of ports and protocols in this view):
2: Enable Mediationserver co location on the Front end server, and point it to the gateway created in step 1 (ps: make a note of ports and protocols in this view) :

When these steps are completed, they need to be published to the Configuration store for tou to do anything more.
The next steps are all done in the CSCP consol
3: Dialplan and Normalization
Everybody needs a Dial-plan configures to make calls. In a small environment (such as my lab) you can get away with using the default “Global” Dial-plan. In this Dial-plan you must have normailzation rules (unless you expect everyone (I mean everyone and everything) to dial using the full e.164 format of +%countrycode%%extention%).
I based my two normalization rules on the end-users dialing habits, and how I expect the called party to be displayed when coming from CUCM. (note: 0 is used as PSTN access code)

4: Voice policy, Pstn usage and routes,
Now then, the following steps can be configured in different manners. But (again) in my simple deployment I decided to follow these steps.
4-1; Enable the Media Bypass in network configuration

4-2; Add a pool (or site) trunk to your configuration

4-3; Configure Media bypass on the trunk, and create translation patterns as needed.
Why? Well, not all gateways will accept the + as an incoming number, ans in a large enterprise you might have different dialing rules in different locations. In my setup, I have made sure the called number (which is what we translate) is exactly identical to how numbers appear when users dial from the CUCM itself. This way, I will make use of the existing dialplan on the CUCM for outgoing calls, and only create a tiny translation pattern for call local to the PBX. == A minimum of configuration changes for CSS, PT’s and TP’s needed on CUCM when we get there)
![]()
4-4; Use the Global Voice Policy, and add a new PSTN Usage
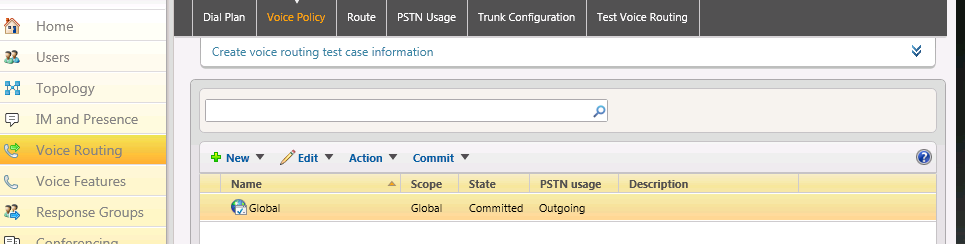

4-5; In the PSTN usage, create a route (Note: I only need one route, as everything was previously normalized)

4-6; Point the rout to the PSTN gateway/Trunk

4-7; Test Voice routing in the CSCP, and verify that everything is acting the way you intended it to

5; Enable a user for Enterprise voice, and assign policies.
Note that all the policies and usages are set to automatic in my scenario. They are set based on:
– Some usages are global = as long as you are enabled, and no more specific rules are set they apply to you.
– Some usages are based on site = in which site you belong (have not touched on site in this post)
– Some settings are based on pool = which pool is your account logged in to

That’s it for the Lync Server configuration.
Now, let’s head over to the CUCM.
If you have been paying attention, you will soon realize Microsoft has changed default ports for the SIP signalling traffic. There used to be a “standard” using TCP 5060 or 5061 on sip-trunks. But as the Lync sever is growing ever more scalable and now supports multiple gateways, a limitation in just using 5060 and 5061 would soon create an issue in many environments.
In CUCM, the default listening port is 5060 for sip trunks and this does not at all match with the settings from figure 1. One way to fix this is to alter the configuration in figure 1 to match the CUCM of port 5060. The other way is to set up a sip profile on the CUCM side to match the incoming connection of TCP 5066, as shown here.
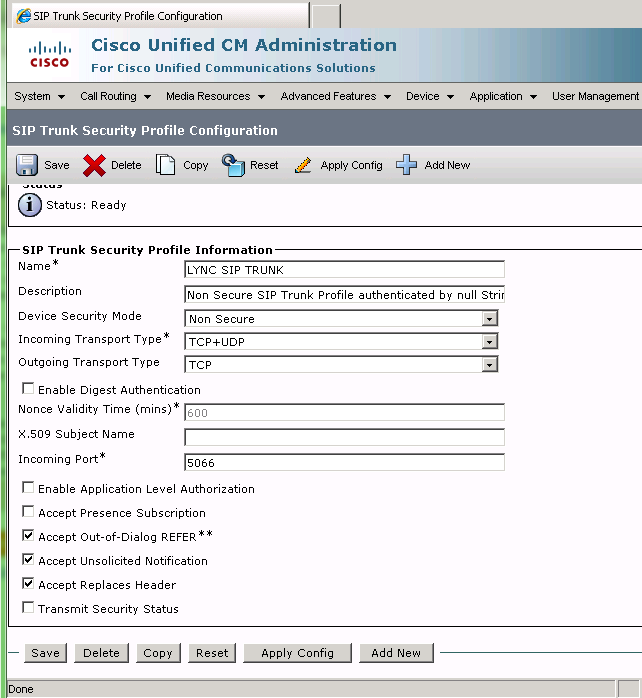
6: Creating a Sip Security Profile in CUCM.
Logged into the CUCM administration site, Go to “System > Security > Sip Trunk Security Profile”. If you don’t see any profiles here, click “find”. Then go to the “Non secure sip trunk profile”. Copy this, and edit the port number. You may also select the check-boxes I have.
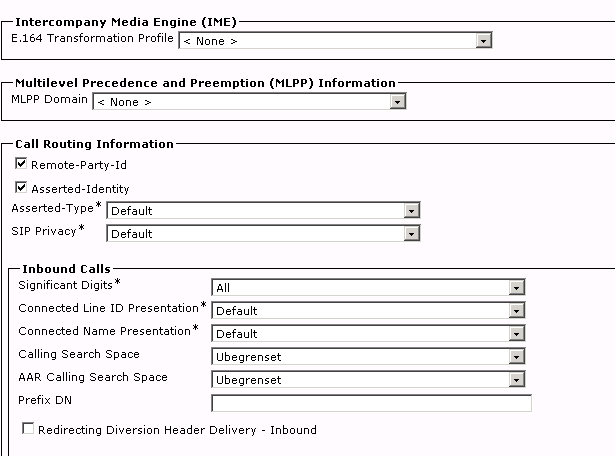
7; Taking care of incoming calls, and routing them the correct way.
As my CUCM is a fully functional PBX with an existing setup, there is very little I have to do. But I’ll explain the basic configuration here.
In my system I have a Calling Search Space (CSS) named CSS-International which I will use wit the Sip trunk. This CSS sees all my partitions (and all my route patterns) in the system. Since we in step 3 made sure the “called party” would be similar to the way users dial from their CUCM phones, we already have patterns matching the 0xxxxxxxx (actually it will match anything from 0xxx to 0xxxxxxxx) and 000xxxxxxxxxx patterns necessary to route the call to PSTN.